I get emails from time to time from people with questions about starting a blog and I always email back with lots of info, so I decided to finally publish a comprehensive guide to starting your own blog! I’m also including answers to a few questions I’ve received most often. It’s a bit of a long post since I wanted to provide a lot of detail, but I hope it’ll be helpful to you if you’re considering blogging.
Q: Why start a blog?
Starting a blog was one of the best decisions I’ve made in college. I thought about it for months and then after some encouragement from my big sis, I finally took the plunge and created mine at 11:00 one night over fall break during my freshman year of college.
My blog began as a fun hobby when I was 19. Now at 21, my blog’s grown into a platform I can use to communicate with thousands of people every day. It’s given me the chance to work with awesome brands like Bob’s Red Mill, Amazon Prime Student, Barilla, HP, and more.
My blog has allowed me to make some side income as a college student, in addition to my campus RA and research jobs. Some months, I’ve actually made more from the blog than I have from my “official” jobs, which is something I never would’ve expected when I started blogging.
I’d definitely encourage you to start your own if blogging is something that interests & excites you, if you enjoy writing, and if you feel like you’d enjoy blogging as a creative outlet.
Q: What does “self-hosted” mean?
If you look at my blog’s url, you’ll see that the site is www.www.healthy-liv.com. There’s no .wordpress or .blogspot after www.healthy-liv.com because I own my domain name and pay a few bucks for hosting every month, which means I’m self-hosted.
Q: I’m thinking about starting a blog, but I’m not sure if I want to pay for it since there are free options available. Why should I go self-hosted?
I briefly considered a free site (Blogger, SquareSpace, etc.) when I was setting up my blog, but quickly decided to buy my own domain name and pay for self-hosting from the beginning for a few reasons.
-The url is less cluttered and more professional looking
-I’d been thinking about starting a blog for a while so it wasn’t an impulse decision– it was something I wanted to take semi-seriously and I figured most hobbies have a little bit of a start-up cost
-Self-hosted sites allow you to use plugins to customize your site, which are awesome and super easy to use. See how you can hover over a picture on my site and a “pin it” button pops up? Plugin. And see the Instagram box in the right sidebar? Another plugin.
-I liked having the possibility of eventually running ads or writing sponsored posts occasionally, which you aren’t allowed to do on a free site
-If you use a free site like .wordpress.com or blogger, they have full rights to any content you publish and can even run their own ads on your site, which won’t earn you a dime
-I’d heard switching from a free site to a self-hosted site later is a bit of a hassle
I started running ads on my site a few months after starting it up, and within two more months, even with my small amount of traffic at the time, all of my blog costs for the whole year had been covered! So, yes, starting a blog self-hosted is an investment, but by growing your readership and eventually installing a few ads, you can easily cover your costs.
Q: What’s the difference in wordpress.org and wordpress.com?
WordPress.org is the platform you can use for a self-hosted site. WordPress.com is the platform you can use for a free site (which will include .wordpress.com as part of the url). I use wordpress.org, as do most bloggers, and this is the platform that’ll automatically be set up for you if you follow the steps below.
Let’s Get Started!
What You’ll Need:
-About 20 minutes to set things up
-A credit or debit card to pay for hosting (a few bucks per month)
Just to let you know, if you choose to use the hosting company I use and recommend and click the link provided, I’ll receive a small commission. This doesn’t impact your price in any way, but it provides a small reward for me for referring you as a new blogger. If you don’t feel comfortable using my link or coupon code, though, please feel free to skip it and go directly to BlueHost or whatever hosting site you prefer. No hurt feelings at all!
Step One: Pick a Host for Your Site
There are a bunch of hosting options out there that range in price and services. I wanted to go with a company with a good reputation that offers a basic, inexpensive option that would provide everything I wanted (basically just hosting and the domain name). I didn’t want to pay for a big bundle of things I didn’t really need like multiple email addresses, multiple sites, etc.
So, I chose BlueHost because they have an incredibly affordable option for bloggers starting out and great 24/7 phone support. I’ve used them for hosting for my 2+ years of blogging and been totally happy with them. I know some bloggers who’ve had issues with their site’s hosting going down for a few hours or even a day, but I’ve never experienced that with BlueHost.
Even when I once fiddled with code and turned my entire site turn into a white box (that’s right…just a white square on the screen) and called BlueHost in a panic, they kindly helped me restore my blog from their back-up in about five minutes.
Step 2: Pick your domain name and purchase a hosting package
If you start your website with BlueHost, they include a free domain (that’s your www.healthy-liv.com or your bestcookintheentireworld.com or whatever website url you choose!) You just have to decide what you want to call your site. I came up with Healthy Liv as a sort of a play on my name “Liv” and the term “healthy life” and healthyliv.com was already claimed as some random abandoned site, so I went with www.healthy-liv.com.
For the hosting package, I recommend going with the “basic” package since it’s all you really need. I chose to pay a bit extra for a back-up service, but that’s the only other “add-on” offered I chose.
Step 3: Install WordPress
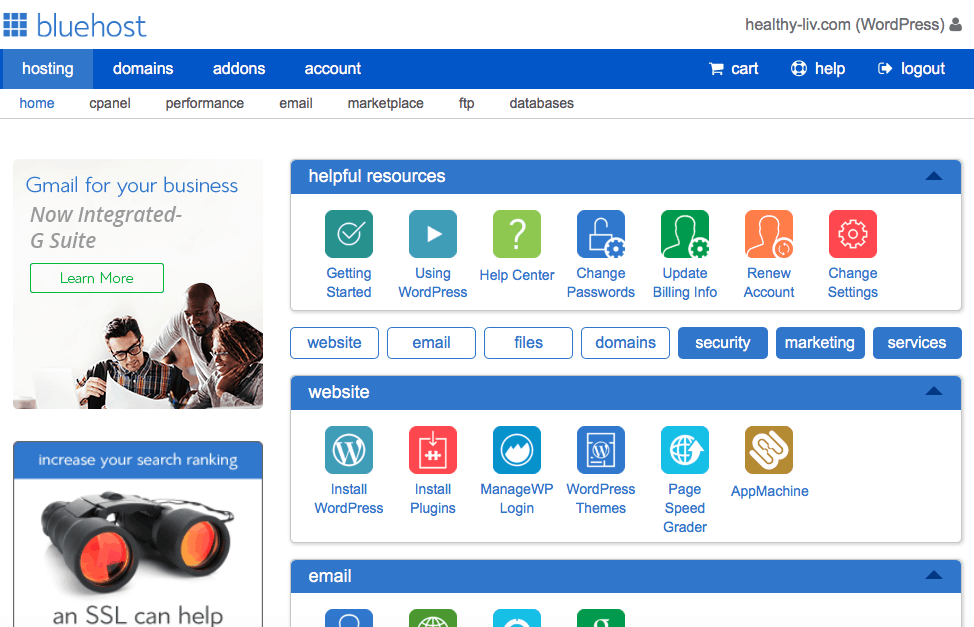
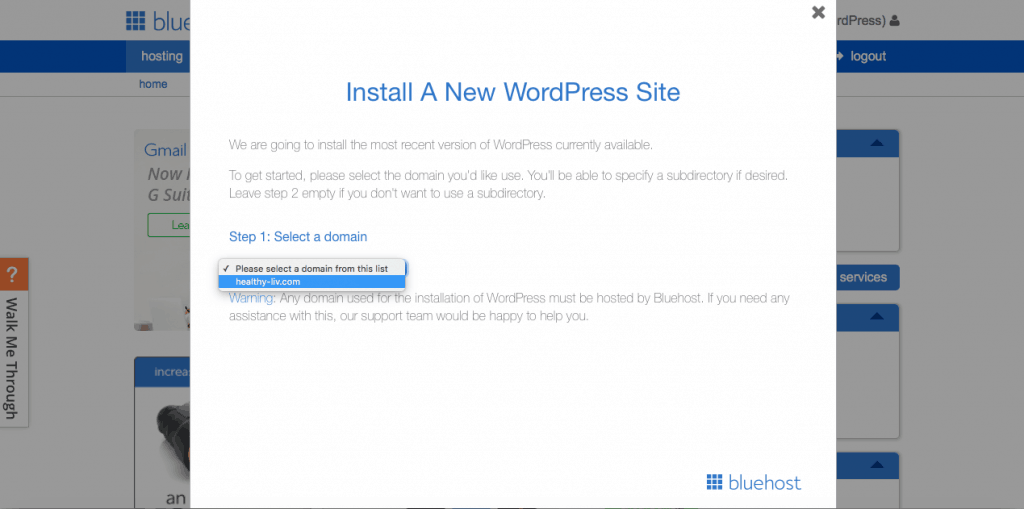
This is the final step for setting up your great new site! If you go with BlueHost, you’ll need to visit my.bluehost.com and sign in using your new login and password. Under website, in the middle of the page, click “Install WordPress.”
Step 4: Design Your Blog By Selecting A Theme
Time for the fun part! This is where you get to decide how you want your blog to look. When I was starting a blog, I wasn’t ready to invest in buying a theme, so I picked the free Sugar and Spice theme. This theme looked nice and served me well for about a year until I outgrew it and decided to purchase a theme that allowed me to customize my site a bit more.
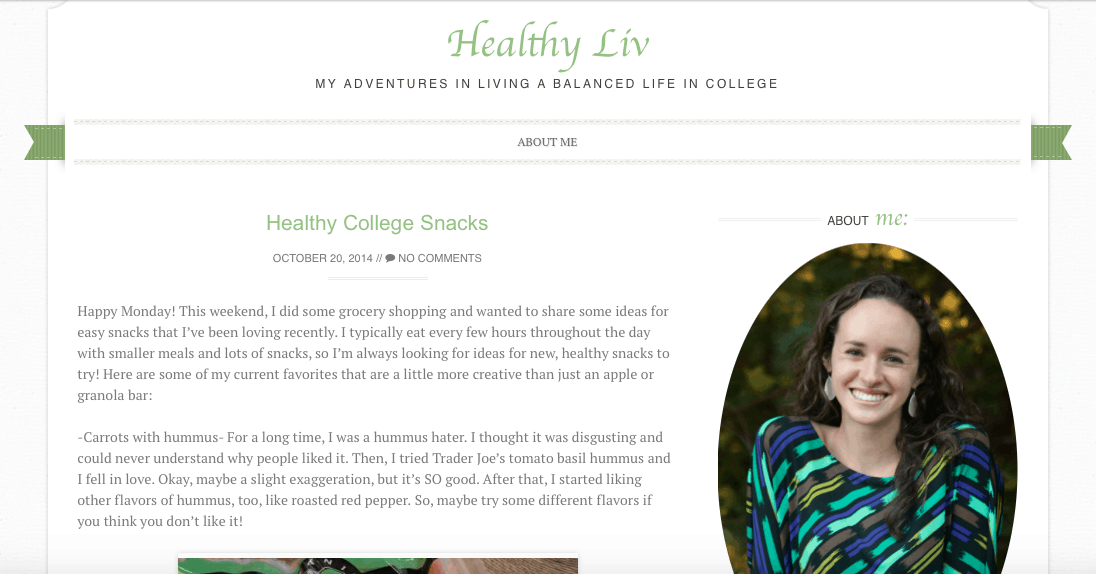
One of my first posts, back in the days of the Sugar and Spice theme. I added more menu options later.
If you go to the “Appearance” tab on your sidebar or header, you can find a bunch of free themes that are easy to install. I definitely recommend starting out with a free theme if you’re not sure exactly how much money you want to invest in your blog yet.
Step 5: Set Up The Basics: Your Bio, “About Me” page, etc.
This is another fun part. Now that the technical part of starting a blog is done, you can start filling in all of the info people will see when they come to your site. I recommend going to Pages>Add New and creating an “About Me” page first since that’s where lots of new people will head when they visit your site for the first time. From your “About Me” page, they’ll be able to get an idea of who you are and what your blog is all about. I also recommend creating a short bio with a picture on your sidebar so people see a friendly face when they land on your site. Then, you can write your first blog post!
Plan to spend some time tinkering around with your site and exploring the backend of your WordPress site. You can add free plugins to customize your site, which you can find when you go to Plugins>Add New. Some of my favorite plugins:
-Comment Email Reply: automatically emails commenters when I respond to their comment
-Instagram Feed: displays a bit of my Instagram feed in my sidebar
-Visual Recipe Index: displays all of my recipes in visual form on the recipe page
Congratulations– you’ve created your own blog!
I hope you have as much fun blogging as I have. If you run into any hiccups along the way or have any questions about starting a blog (or anything else!), I’d love to answer them. Feel free to comment below or email me any time at liv@healthy-liv.com.
Pin this post for later:
So proud of you for all the research and time you have spent to help people find a healthy lifestyle.
Thanks, Gee!!
I love your blog and how you’ve even been able to make some side money from it; it’s such a clean easy to navigate blog, and you would be the perfect person to tell people how to start one.
Thanks, Emily! Clean and easy-to-navigate is exactly what I’m going for, so it’s great to hear that!
I’ve been reading your blog for about a year and love it! These tips are great and I wish you all the best with your blog <3
Love that you’ve been reading for so long! Thanks, Edye!
This is such a great guide! I am so glad you started blogging so I could get to know you! xo
I second that! Happy we’ve been able to get to know each other, even living halfway across the world!
If you follow all of your advice consistently, you will have to create a very positive and informative blog.
I think it’s a good idea to start your own blog, especially if you have the information to share. Thanks a lot for that.
While you are still in college, you can chisel out some great opportunities for your future by using your hobbies, interests and passion to create a profession out of it. College is the time for exploring, learning and questioning that will morph your personality as a whole but you can explore more by starting your own blog, here are few reasons why you need one.
http://ensblog.com/2017/07/reasons-start-blogging-while-studying-college-make-money-online/
Unless there is a zombie apocalypse or alien invasion and you are the chosen one to save the world, you have all the reasons and time to start a blog.
Stop searching for reasons. Start with your blog now. You’ll either do it or you will learn. Take the aid of your hobbies, interests and passion to create a profession out of it and chisel out some great opportunities for your future.
If you still seek a reason then check out my blog on why you should start blogging while in college.
http://ensblog.com/2017/07/reasons-start-blogging-while-studying-college-make-money-online/
Happy blogging
It’s great to see that you are taking the initiative to share your knowledge and help people who are interested in starting their own blogs. By building a list of tips, you’re essentially offering a valuable resource that goes beyond one-off email responses that can be time-consuming. For beginners who are just starting to create a blog, I would also recommend considering such an option as a custom term paper writing service . This will help beginners get quality content for their blog, especially if they don’t have enough experience or time to write content themselves.
I will rely on the experiences you share to create my own blog.